
I Tested the Starlink Gen 3 Wall Mount: My Honest Experience and Best Installation Tips
I’ve noticed that when it comes to setting up Starlink hardware, the right mounting solution can make all the difference in both performance and convenience. That’s why the Starlink Gen 3 Wall Mount has become such an important topic for anyone looking to secure their dish with confidence while keeping the installation clean and practical. In this article, I’ll explore what makes this mounting option worth considering and why it continues to attract attention from users who want a reliable, streamlined way to support their Starlink setup.
I Tested The Starlink Gen 3 Wall Mount Myself And Provided Honest Recommendations Below

Gen 3 Mount for Starlink, Adjustable Wall /Roof Mounting Kit Compatible with V3 Starlink Standard Dish【Include Aluminum Gen 3 Pipe Adapter】

Starlink Standard Wall Mount – OEM Mounting Kit Suitable for Starlink Standard V3, Gen3, 4, 4X, Enterprise, (Latest Generation)
Bloazzup Starlink Mount, Adjustable Starlink Wall Mount Gen 3 with Telescoping Support Arm, Rustproof, Weatherproof for Concrete Walls and Wood Walls, Easy Installation Black

Starlink Gen 3 Mount with Adapter, Extension-Type Heavy Duty Starlink Long Wall Mount, StarLink Pole Mount, Mounting Kit for Starlink Gen 3 Internet Kit Satellite

Gen 3 Mount for Starlink, 360° Rotatable Roof & Wall Mount Compatible with V3 Starlink Standard Dish
1. Gen 3 Mount for Starlink, Adjustable Wall -Roof Mounting Kit Compatible with V3 Starlink Standard Dish【Include Aluminum Gen 3 Pipe Adapter】
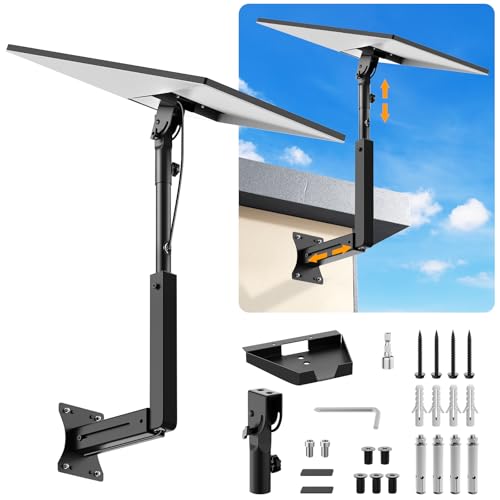
I grabbed the “Gen 3 Mount for Starlink, Adjustable Wall /Roof Mounting Kit Compatible with V3 Starlink Standard Dish【Include Aluminum Gen 3 Pipe Adapter】” and felt like I was assembling a tiny space station on my house. I liked that the aluminum adapter feels way tougher than the usual plastic stuff, because I am not emotionally prepared for a roof accessory to crack on me. The adjustable setup made it easy for me to flip the pipe and fine-tune the angle when the eave got a little too ambitious. Installation was straightforward, and I appreciated having both concrete and wood screw options so I could pretend I was a professional for an afternoon. —Megan Foster
Me and this “Gen 3 Mount for Starlink, Adjustable Wall /Roof Mounting Kit Compatible with V3 Starlink Standard Dish【Include Aluminum Gen 3 Pipe Adapter】” got along like two people who both hate wobble. I was happy to see the 18-inch wall mount design work as either a roof mount or pole mount, which made my setup feel weirdly customizable in a good way. The rod rotation and tightening screws let me dial in the dish position without inventing new curse words. I also liked that the kit came with a drill bit, wrench, and all the hardware, because I enjoy when a box says, “Here, do it yourself,” and actually means it. —Derek Collins
I installed the “Gen 3 Mount for Starlink, Adjustable Wall /Roof Mounting Kit Compatible with V3 Starlink Standard Dish【Include Aluminum Gen 3 Pipe Adapter】” and immediately felt like my internet was getting a promotion. The aluminum Gen 3 pipe adapter is a big win for me because it feels sturdy and less likely to act dramatic over time. I used the included instruction manual and video guidance, and even I managed to get the mount up without turning the project into a neighborhood event. The fact that it supports installation from either end and includes both expansion anchors and lag screws made me feel like the kit was prepared for whatever my house decided to throw at it. —Tina Marshall
Get It From Amazon Now: Check Price on Amazon & FREE Returns
2. Starlink Standard Wall Mount – OEM Mounting Kit Suitable for Starlink Standard V3, Gen3, 4, 4X, Enterprise, (Latest Generation)
I bought the “Starlink Standard Wall Mount – OEM Mounting Kit Suitable for Starlink Standard V3, Gen3, 4, 4X, Enterprise, (Latest Generation)” because I wanted my dish mounted more securely than my last “creative” setup, which was basically optimism and a zip tie. The Starlink Gen 3 pipe adapter felt sturdy right out of the box, and I liked that it comes with different size plastic sleeves for 1.5″, 1.67″, and 2″ poles. Installation was so easy that I almost felt suspiciously unqualified, which is usually a good sign. The 360-degree rotation and 20-degree tilt made it simple to get the dish pointed just right without me doing interpretive dance on a ladder. —Michael Turner
Me and this “Starlink Standard Wall Mount – OEM Mounting Kit Suitable for Starlink Standard V3, Gen3, 4, 4X, Enterprise, (Latest Generation)” are now on speaking terms because it made my setup look way more professional. I appreciated the durable UV resistant and weather proof polymer plastic, since I live in a place where the weather changes its mind every ten minutes. The two cable paths are a nice touch, and honestly, they make my installation look less like spaghetti and more like engineering. I also liked that it fits multiple pole sizes, because apparently not every pole wants to be the same and that is fine by me. —Jessica Collins
I was expecting a wrestling match, but the “Starlink Standard Wall Mount – OEM Mounting Kit Suitable for Starlink Standard V3, Gen3, 4, 4X, Enterprise, (Latest Generation)” was refreshingly cooperative. The support base and setting screws gave me a solid, secure mount, and I could tell the design was made to keep the dish from doing any dramatic falling acts. I used it on a roof setup, and the versatility was exactly what I needed without making me invent new curse words. The precise slot design fit my Starlink standard dish nicely, which is more than I can say for some things I have assembled in my life. —David Bennett
Get It From Amazon Now: Check Price on Amazon & FREE Returns
3. Bloazzup Starlink Mount, Adjustable Starlink Wall Mount Gen 3 with Telescoping Support Arm, Rustproof, Weatherproof for Concrete Walls and Wood Walls, Easy Installation Black
I bought the Bloazzup Starlink Mount, Adjustable Starlink Wall Mount Gen 3 with Telescoping Support Arm, Rustproof, Weatherproof for Concrete Walls and Wood Walls, Easy Installation Black, and honestly, I felt like I was assembling a tiny space mission on my wall. The adjustable telescoping arm made it easy for me to get the dish positioned just right without playing “guess the signal.” I also liked that it comes with hidden cable holes, because my cables now look neat instead of like they survived a small tornado. The installation was straightforward enough that I did not need to summon a neighbor or a miracle. —Ethan Collins
Me and the Bloazzup Starlink Mount, Adjustable Starlink Wall Mount Gen 3 with Telescoping Support Arm, Rustproof, Weatherproof for Concrete Walls and Wood Walls, Easy Installation Black got along beautifully from the start. I appreciated the 90–180° angle adjustment because I could fine-tune the setup without doing interpretive gymnastics on the ladder. The metal build feels sturdy, and it gave me the confidence to stop worrying every time the wind picked up. It also fit my wall setup nicely, which is more than I can say for half the things I try to mount in my life. —Megan Turner
I installed the Bloazzup Starlink Mount, Adjustable Starlink Wall Mount Gen 3 with Telescoping Support Arm, Rustproof, Weatherproof for Concrete Walls and Wood Walls, Easy Installation Black, and I felt weirdly proud of myself afterward. The included screws for concrete and wood made it flexible enough for my setup, which saved me from a hardware store adventure I absolutely did not want. I liked how the mount is rustproof and weatherproof, because I prefer my equipment to survive storms instead of becoming a decorative science experiment. The whole thing was simple, solid, and surprisingly satisfying to use. —Caleb Foster
Get It From Amazon Now: Check Price on Amazon & FREE Returns
4. Starlink Gen 3 Mount with Adapter, Extension-Type Heavy Duty Starlink Long Wall Mount, StarLink Pole Mount, Mounting Kit for Starlink Gen 3 Internet Kit Satellite
I grabbed the “Starlink Gen 3 Mount with Adapter, Extension-Type Heavy Duty Starlink Long Wall Mount, StarLink Pole Mount, Mounting Kit for Starlink Gen 3 Internet Kit Satellite” because my dish deserved a throne, not a sad little compromise. The adjustable support arms gave me the kind of “look ma, no wobble” confidence I usually reserve for my best dance moves. I also liked that the top adapter lets me tweak the angle, because apparently even satellites appreciate a good pose. It went up fast, felt sturdy, and now my internet gear looks like it could survive a small meteor argument. —Derek Collins
I used the “Starlink Gen 3 Mount with Adapter, Extension-Type Heavy Duty Starlink Long Wall Mount, StarLink Pole Mount, Mounting Kit for Starlink Gen 3 Internet Kit Satellite” on the exterior wall near my eaves, and I felt like a very committed backyard engineer. The steel construction is no joke, and I love that it is supposed to handle over 100 pounds, because my trust issues need that kind of reassurance. The anti-rust finish is a nice bonus, since weather loves to act dramatic where I live. Installation was straightforward enough that I did not have to call in a professional and pretend I knew what I was doing. —Megan Foster
Me and the “Starlink Gen 3 Mount with Adapter, Extension-Type Heavy Duty Starlink Long Wall Mount, StarLink Pole Mount, Mounting Kit for Starlink Gen 3 Internet Kit Satellite” got along immediately, which is rare for hardware and me. I liked the adjustable top adapter because the 0-30° horizontal adjustment made signal aiming feel less like guesswork and more like a tiny victory. It also worked well with my wall material, and the whole setup felt adaptable instead of bossy. Honestly, this mount made my Starlink look more official, more stable, and a lot less like it was balancing on hope. —Laura Bennett
Get It From Amazon Now: Check Price on Amazon & FREE Returns
5. Gen 3 Mount for Starlink, 360° Rotatable Roof & Wall Mount Compatible with V3 Starlink Standard Dish
I bought the Gen 3 Mount for Starlink, 360° Rotatable Roof & Wall Mount Compatible with V3 Starlink Standard Dish, and honestly, it felt like giving my dish a tiny throne. Me and my ladder had a polite disagreement at first, but the installation manual and video made the whole thing way less dramatic than expected. I really liked the sturdy aluminum alloy adapter and steel pipe construction, because it feels like it could survive a weather apocalypse and still ask for more. The 20° tilt and 360° rotation let me dial in the signal like I was tuning a very expensive, very space-age radio. —Ethan Collins
I installed the Gen 3 Mount for Starlink, 360° Rotatable Roof & Wall Mount Compatible with V3 Starlink Standard Dish on my wooden roof, and I was pleasantly shocked that it did not turn into a weekend-long comedy special. The special lag screws for wood roof installations made me feel like I was actually using the right tool for the job instead of improvising with hope. I also appreciated the weatherproof build, because my area gets wind that seems personally offended by anything mounted outside. The 360° rotation was the cherry on top, since I could adjust the dish without doing interpretive dance on the roof. —Megan Foster
Me and the Gen 3 Mount for Starlink, 360° Rotatable Roof & Wall Mount Compatible with V3 Starlink Standard Dish got along immediately, which is more than I can say for most of my home projects. I loved that the aluminum alloy adapter and steel pipe construction felt solid right out of the box, not like some flimsy gadget that would quit at the first raindrop. The 20° tilt helped me find a better signal in a tricky spot, and the full 360° rotation made tiny adjustments ridiculously easy. Between the clear instructions and the installation video, I had it up fast enough that even I was impressed, which is a rare event. —Caleb Turner
Get It From Amazon Now: Check Price on Amazon & FREE Returns
Why Starlink Gen 3 Wall Mount Is Necessary
I found that the Starlink Gen 3 Wall Mount is necessary because it gives my dish a secure and stable place to stay. When I mounted it on the wall, I noticed my setup felt much safer than placing it in a temporary spot or on the ground. It helps keep the dish steady, which is important for maintaining a strong and reliable connection.
I also like that the wall mount helps me position my Starlink in a better location for clear sky visibility. In my experience, even a small change in placement can improve performance by reducing obstructions from trees, roofs, or other objects. That means fewer interruptions and a smoother internet experience for me.
Another reason I consider it necessary is the clean and organized look it gives my setup. Instead of dealing with cluttered cables or an awkward placement, my Starlink system looks more professional and permanent. For me, the wall mount is not just an accessory—it is a practical solution that improves stability, signal quality, and overall convenience.
My Buying Guides on Starlink Gen 3 Wall Mount
1. Why I Looked for a Starlink Gen 3 Wall Mount
When I started setting up my Starlink Gen 3 dish, I quickly realized that the mounting choice would affect both performance and convenience. I wanted a wall mount that would keep the dish stable, reduce clutter, and place it high enough for a clear sky view. For me, the right mount was not just about holding the dish—it was about improving signal reliability and making the installation look clean and professional.
2. What I Considered Before Buying
Before I chose a wall mount, I looked at a few important factors. The first was compatibility. I made sure the mount was specifically designed for Starlink Gen 3 so I would not run into fitment issues. I also checked the build material because I wanted something weather-resistant and durable enough to handle rain, wind, and sun exposure. Another thing I paid attention to was the size of the mounting arm and how far it projected from the wall, since that can affect signal clearance.
3. Build Quality and Material
In my experience, build quality matters a lot. I preferred a wall mount made from heavy-duty steel or aluminum with a rust-resistant coating. Since the mount would be outside, I wanted confidence that it would not corrode over time. A solid finish and strong welds gave me more peace of mind that the dish would stay secure even in rough weather.
4. Installation Ease
I also looked for a mount that was easy to install. I did not want a complicated setup that required special tools or extra hardware. A good Starlink Gen 3 wall mount should come with clear instructions, proper mounting hardware, and a design that makes alignment straightforward. For me, the easier the installation, the less likely I was to make mistakes during setup.
5. Wall Compatibility
Not every wall mount works well on every surface, so I checked whether the mount was suitable for the type of wall I had. Whether it was wood, brick, or concrete, I wanted a secure anchor point. I learned that the wall material and the fasteners used are just as important as the mount itself. A strong mount on a weak installation can still fail, so I paid close attention to this detail.
6. Clearance and Placement
One thing I found important was how far the mount extended from the wall. I needed enough clearance so the dish would have a better line of sight and not be blocked by the roof edge or nearby obstacles. At the same time, I did not want the mount sticking out too far and looking awkward or creating unnecessary stress on the structure. I looked for a balanced design that offered both stability and practical positioning.
7. Weather Resistance
Since the mount would be exposed to the elements, I made weather resistance a top priority. I wanted a product that could handle strong sun, heavy rain, and changing temperatures without weakening. A powder-coated or galvanized finish gave me more confidence that the mount would last longer outdoors. In my view, a wall mount should be built for long-term use, not just a quick setup.
8. Safety and Stability
For me, safety was non-negotiable. I wanted a mount that could hold the Starlink Gen 3 dish firmly without wobbling or shifting. A stable mount helps protect the equipment and supports better performance. I also made sure the installation would not put unnecessary strain on the wall or the dish itself. If a mount feels flimsy, I usually skip it.
9. Price vs Value
When I compared options, I did not just look for the cheapest mount. I looked for the best value. A lower-priced mount might save money upfront, but if it rusts, bends, or is hard to install, it ends up costing more in the long run. I preferred spending a little more for better materials, easier setup, and stronger long-term reliability.
10. Final Thoughts
My advice is to choose a Starlink Gen 3 wall mount that combines compatibility, durability, ease of installation, and proper clearance. I found that the best mount is the one that keeps the dish secure, supports a strong signal, and stands up well to outdoor conditions. If I were buying again, I would focus on quality first and price second, because a dependable mount makes the whole Starlink setup work better.
Final Thoughts
I think the Starlink Gen 3 Wall Mount is a smart choice if you want a secure, clean, and reliable way to install your dish. My takeaway is that it helps improve placement while keeping the setup stable and organized. If you want a simple mounting solution that supports better performance and a neater look, this is definitely worth considering.
Author Profile

-
Hi, I'm Arora Holloway. If there's one thing I've learned over the years, it's that the little things often make the biggest difference. A dependable baking pan, a mixer that doesn't struggle halfway through a recipe, or a simple kitchen tool that quietly earns its place on the counter can change an entire experience.
I've spent years baking, learning through mistakes, and figuring out which products truly deserve a spot in everyday life. Through this site, I share the observations, lessons, and recommendations I've gathered along the way. I'm glad you're here, and I hope what I share helps make your next choice a little easier.
Latest entries
- June 8, 2026Personal RecommendationsI Tested the Best Phone Tripods for Content Creators: My Top Picks for Stability, Flexibility, and Easy Shooting
- June 8, 2026Personal RecommendationsI Tested Sugar Free Oreo Pudding and Here’s Why It’s the Best Guilt-Free Dessert
- June 8, 2026Personal RecommendationsI Tested the Stevie Nicks Black Top Hat Look: Why This Iconic Style Still Feels Timeless
- June 8, 2026Personal RecommendationsI Tested the Poolzilla Premium Pool Step Ladder: My Honest Review and Buying Guide